
Before beginning, you should know the proper sizes of your books. If the book is not in a hardcover format, the cover size should be approximated and two inches should be left at the top and bottom, as well as three inches on each side when the book is laid flat. The thickness of the cover should match the thickness of the book and the jacket. Here are some tips to cover a book:
Footband
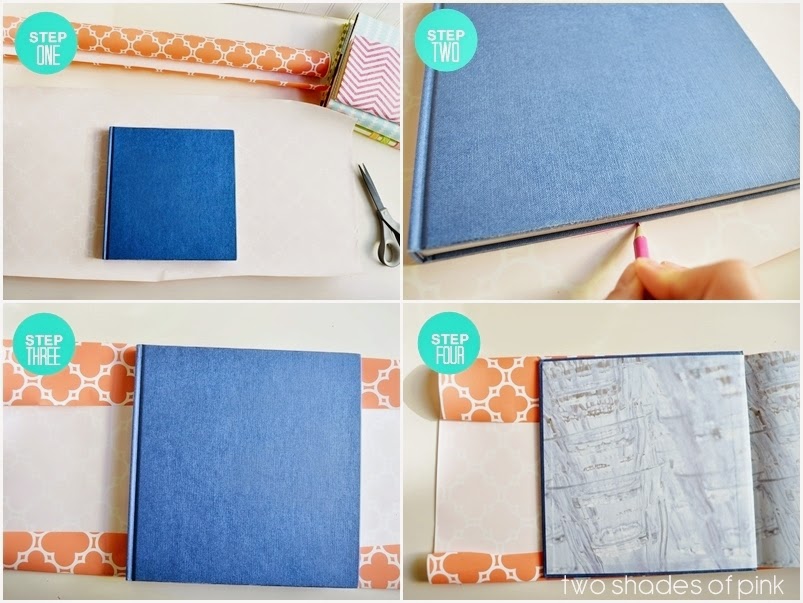
When you are ready to create a cover for your book, there are a few steps you should follow. First, you need a large piece of paper. It should be about 6 inches long and three inches taller than your book. Once you have the size of your cover, fold the paper a quarter of an inch from the edge and tape it down. Next, fold the top and bottom edges of the paper down parallel to the bottom fold. Make sure the edges are even. Using a popsicle stick, you can crease the fold. Now, you can fold the top and bottom of the paper inward, so that the paper hugs the spine of the book.
Once you have the paper cut to size, fold it and place it over the book. Do not pull too tightly! Keep the paper parallel to the book’s spine and make sure the two sides of the paper fold over evenly. Then, fit the cover onto the book. This process can be repeated as necessary, so make sure you keep the paper in the right place! Ultimately, you should have a book cover that will last a lifetime.
Gutter
If you are wondering how to cover a book with gutter paper, you have many options. This decorative technique is often used for zigzag books with important content printed on the edge of the page. The paper you use for the cover will be glued to the first and last pages of the text block. Because the gutter will obscure 3-5mm of the page image, it is advisable to keep the important information out of this area. To offset the images that cross the spine, slide the left hand page image left.
The gutter will be a larger margin on the inside of the pages to keep the text from fading into the binding. Generally, this gutter will be enough for most books. All page layout software will add this gutter for you automatically. However, if you have full page images that are not centered, you will need to pay close attention to the gutter. You want the image to be transitioned seamlessly across the two pages.
Recto
Whether you’re covering a hardcover or a softcover, you can learn how to cover a book with paper to add a finishing touch to your project. The main purpose of the paper flap is to hold the book in place, but it’s also important that the flap has enough crease to stay in place. The best way to do this is by laying the book on a piece of paper, about an inch or two from the binding. Then, fold the paper flap over the spine, tucking it into the other side.
First, make a crease at the top and bottom of the paper. This fold should be a half to one-half inch deep. When tucking in the paper flap, you want to leave a bit of extra paper on the edges. Once you’ve positioned the front cover, slide it inside the fold and slide it in. You can adjust the paper flap to cover the back cover, if you want to.
Flyleaf
You can create a flyleaf cover for a book by making the inside pages of the book thicker. Glue the two interior pages of the flyleaf together, creating a thicker cover. Next, you can glue a piece of card stock between the two flyleaves. Make sure to use card stock that has the proper grain direction and is slightly smaller than the book’s size. Also, you can place some waste paper in between the paper sheets to collect any runoff glue.
After Marsden discovered strike-through, watered silk was widely used to conceal the adhesive. This was a common practice, as the silk used to cover the flyleaf was watered, so it matched the flyleaf silk. Once watered silk was produced in large quantities, it was made easily in a workshop. Silks were dampened from the back until they were completely saturated.
Endsheet
Traditionally, endsheets are plain white paper printed with text and creative design. But today, these end sheets can be printed in various colors, including PMS shades, full-color, and even one-sided. The endsheets may be made of different types of paper, including textured or colored paper, and can have a slightly different sheen level than the main text pages. Depending on the design, the endsheet may also have different motifs or images.
When creating a hardcover book, you can use 2-Page Endsheets, which are an economical option for a short-run project. These endsheets feature two distinct panels and can be created from a single sheet of paper. A book with two endsheets is called a double-sided hardcover. The paperboard used for the inside cover is typically a dull brown or gray color.