
If you’re in the market for a new book cover, you might want to learn how to make a book cover out of a paper bag. All you need is a brown paper grocery bag and scissors. Cut out the bottom portion of the bag, and the middle of one side. You can then use washi tape and duct tape to make a pretty book cover. And there you have it!
Using
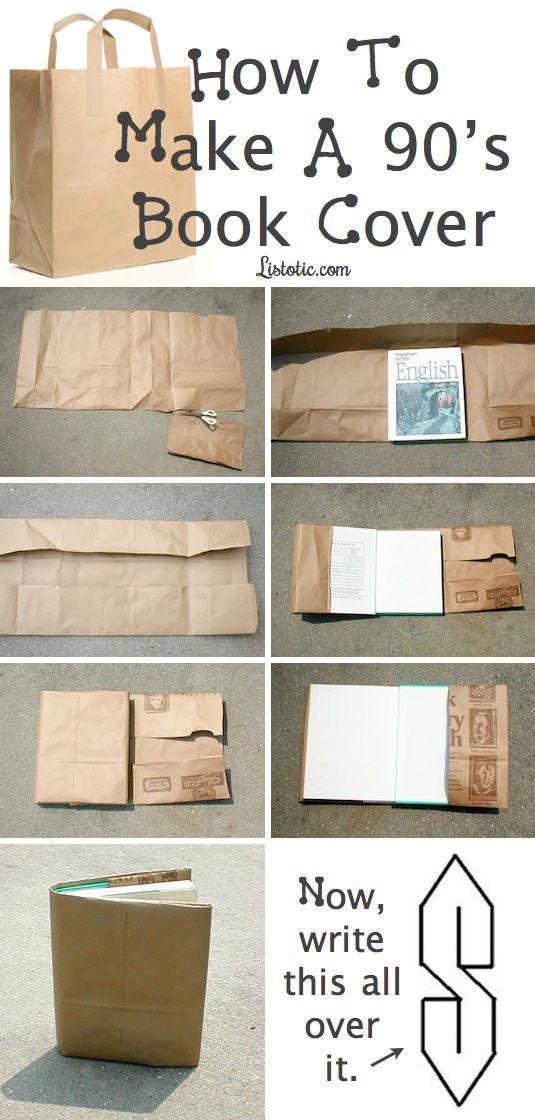
To make a book cover from paper bag, you need to start by preparing the book. Place the book in the center of the paper bag, and make sure that the top and bottom folds of the paper bag are equal in size. Now, fold the left side of the bag over the front cover of the book. Cut the excess paper if necessary. Make sure to leave wiggle room on all sides. You can also use tape to keep the cover from being too tight.
First, get a brown paper bag with a print, and fold it over. Next, use markers, paint, or stamp pads to decorate the paper. Let the paper dry completely before using it as a book cover. The book will be more durable once the paper is dry. You can decorate it with stickers or other embellishments. Make sure that the cover has a sturdy base. After the brown paper has dried, decorate it with your own designs.
Using a brown paper grocery bag
A brown paper grocery bag can make a great book cover. Fold the bottom edge and the top edge of the bag along the book’s spine, and you’ve got a book cover. Place the book inside the bag, then fold the bottom and top edges of the bag tightly. This book cover will keep the book safe from damage and can be reused as many times as you like.
If you’re short on time, you can also use brown paper lunch bags, which can fit a single standard hardcover. The bag’s back face is glued together, and you can remove it by pulling on the seams and folding it over. This leaves you with a large, flat piece of brown paper. You can decorate it with stickers, rubber stamps, and collages. You can even draw or paint on the cover with a pencil or pen, but be careful not to use watercolors, as they will weaken the paper.
Using washi tape
How to make a book cover out of a paper bag is a simple craft project. You can use Washi tape from Scotch Expressions to personalize your book. Washi tape is an excellent adhesive for binding paper items. To create a washi tape book cover, follow these steps. First, cut a piece of paper bag. Next, place one end of the tape on a piece of cardstock and stick it to the other. Then, fold a final strip of tape over itself.
Cut washi tape in many different ways to create a unique design. You can also use it to decorate cabinet or drawer doors. Washi tape’s vibrant colors and beautiful patterns create a relaxing environment. The washi tape is a great addition to scrapbook pages and scrapbook layouts. You can even use it to decorate your walls and furniture. You’ll be amazed at the results!
Using duct tape
If you don’t have an appropriate book cover, you can make one using duct tape. To make your book cover, cut a strip of duct tape about the length of the book’s spine and fold it over the top and bottom edges of the cover. Repeat for the other side and back cover. Place more duct tape on top of the first strip to secure it.
First, cut a piece of duct tape about two inches longer than the book’s width. Cut it into strips that are approximately two inches wide. Carefully place the strips of duct tape onto the paper bag. You can use any pattern you like. The next step is to use tape to make a cover that’s waterproof and sturdy. You can also use duct tape to repair a bent foldout leg of the frame.